When you’re having trouble getting a motor started, many factors can be at play. We’ll take you through simple motor starter troubleshooting techniques to determine the problem and some simple fixes to implement based on each issue.
Before You Begin Motor Starter Troubleshooting
When the motor doesn’t start, a few things must be checked to determine the cause. If this new installation has never worked, it is important to check the wiring diagram and ensure the wires are all connected correctly. If this is an older installation and has worked in the past, it should still be wired correctly unless there have been some recent changes that may have caused the wiring to be altered.
Inspect the cables and terminals to look for any signs of burning, corrosion, cable insulation cracking, or damage. If there is any visual evidence of damage, TURN OFF THE POWER and have an experienced electrician review the components, wiring, and installation. Only proceed with troubleshooting if you don’t see any visual indication of a problem.
Problem 1: Motor Overload Tripped
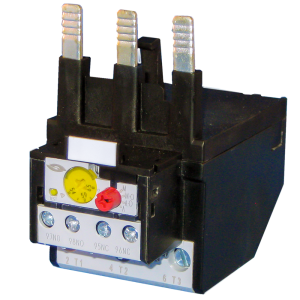 The easiest fix (and most common occurrence) is that the motor overload tripped. The overload protects the motor if the current exceeds the full load amperage. This is like checking/resetting the circuit breaker in your home breaker box. Press the red button on the overload to reset the overload, or if you have an external reset button, press that. This is also a good time to ensure the reset is set to “manual” mode. Check the position of the red button to verify it’s set to “manual.”
Problem 2: Overload Has Failed
If resetting the overload does not work, we can quickly check to see if the overload has failed. Verify the power is disconnected, lockout/tag out the circuit if appropriate, and check the continuity between the two Normally Closed (NC) terminals on the overload using an ohmmeter. The actual resistance measurement is not important; we are just checking to see if there is continuity. If the ohmmeter shows “OPEN” then the overload is bad and should be replaced.
Problem 3: Continuity Between Two NC Terminals
We’ll have to dig in further if the overload shows continuity between the two NC terminals. Take a photo of or record the information from the motor nameplate. It’s important to know the motor’s Voltage, phases, and Full Load Amperage (FLA). Having that information handy can make things go a bit more smoothly.
Verify the overload setting (yellow dial) is set to the Full Load Amperage from the motor nameplate based on the supplied Line power to the motor.
Once you know the required input voltage, use a digital multimeter to verify that all 3 phases of electrical potential are present. Or, if it is a single-phase, verify the single-phase voltage is present. It is best to check this on the cable going into the contactor at terminals L1, L2, and L3, or if there is a disconnect switch, check the incoming wires to the disconnect. Measure between the legs L1, L2, and L3 to verify you have full voltage according to your input line power to the motor.
Problem 4: Missing One or More Phases
If you are missing one or more phases and the circuit includes fuses, disconnect the line power and use your multimeter to check for continuity across the fuses.
Problem 5: Blown Fuse
If one is blown, replace it. Sometimes, fuse holders can become corroded and prevent continuity, so look at the fuse holders for any corrosion, and if some are present, clean it with an electrical contact cleaner and an old toothbrush.
If all the above motor starter troubleshooting has been completed and the motor still won’t start, it’s time to call an electrician. To learn more about motor starters, please contact us at Springer Controls!
